Chip Seal Driveway Resurfacing – 7 Steps for a Strong Surface
Looking to restore your driveway without the high cost of asphalt? Chip seal resurfacing is a durable and cost-effective solution that enhances your driveway’s longevity and appearance.
A chip seal driveway resurfacing method combines hot liquid asphalt emulsion with a layer of crushed stone to create a durable, weather-resistant surface. It’s a budget-friendly alternative to traditional asphalt and offers excellent traction and low maintenance.
How to Resurface a Driveway with Chip Seal in 7 Steps:
- Preparation
- Application of Hot Asphalt Emulsion
- Spreading the Crushed Stone
- Rolling and Compaction
- Curing and Setting
- Optional Second Layer (Double Chip Seal)
- Final Maintenance
This resurfacing method offers a balance of affordability and durability. Read on to learn more about the benefits of chip seal driveways and how they compare to asphalt.
1. Preparation
Proper preparation is the foundation of a durable chip seal driveway. Skipping this step can lead to poor adhesion, premature wear, and costly repairs. Before applying the chip seal, the existing surface must be thoroughly cleaned, repaired, and graded to create a stable and even base.
Key Preparation Steps
Each step in the chip seal driveway resurfacing preparation process plays a vital role in ensuring the chip seal adheres properly and extends the lifespan of your driveway.
- Cleaning the Surface – Remove dirt, debris, and loose materials to ensure proper adhesion of the asphalt emulsion. A clean surface allows for a stronger bond and uniform application.
- Grading and Leveling – Address uneven areas or low spots to create a stable foundation. Uneven surfaces can lead to water pooling and weak spots in the finished driveway.
- Repairing Existing Damage – Fill cracks, potholes, and worn areas to prevent them from affecting the new chip seal layer. Ignoring these issues can cause premature deterioration.
- Ensuring Proper Drainage – Slope the driveway slightly to direct water away. Standing water can weaken the asphalt emulsion and cause the surface to break down faster.
Taking the time to properly prepare the surface ensures the chip seal adheres effectively and provides a smooth, long-lasting finish. Once the base is ready, the next step is applying the hot asphalt emulsion.
2. Application of Hot Asphalt Emulsion
The application of hot asphalt emulsion is a crucial step in the chip seal process, as it acts as the binding agent between the existing surface and the new layer of crushed stone. This emulsion is a heated mixture of liquid asphalt and water, designed to adhere securely to the driveway while remaining flexible enough to withstand temperature changes and traffic.
Key Steps in Applying the Asphalt Emulsion
A precise and even application ensures the stone aggregate bonds properly, creating a strong, long-lasting surface.
- Heating the Emulsion – The asphalt emulsion is heated to the optimal temperature to achieve the correct viscosity for application.
- Spraying the Asphalt – Using a specialized distributor truck, the hot emulsion is evenly sprayed across the prepared surface. A consistent, uniform coat is essential to prevent weak spots.
- Controlling the Application Rate – The amount of emulsion applied depends on traffic levels, climate, and surface condition. Too much can cause bleeding, while too little can lead to poor adhesion.
- Ensuring Proper Coverage – The emulsion must fully coat the surface without pooling or leaving gaps. A smooth, even layer helps maximize durability and prevents premature wear.
Once the hot asphalt emulsion is applied, it remains tacky, allowing the next step—spreading the crushed stone—to begin immediately.
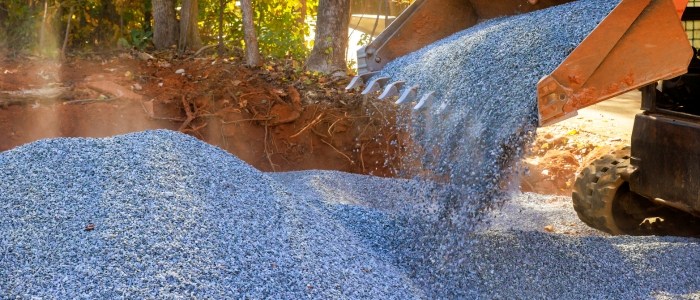
3. Spreading the Crushed Stone
Once the hot asphalt emulsion is applied, the next step in chip seal driveway resurfacing is spreading the crushed stone, also known as aggregate. This layer provides the durability, texture, and traction that make chip seal driveways a cost-effective and long-lasting option.
Key Steps in Spreading the Crushed Stone
For a strong and uniform surface, the stone must be evenly distributed and properly embedded into the asphalt binder.
- Selecting the Right Aggregate – The type and size of crushed stone depend on climate, traffic load, and aesthetic preference. Common choices include granite, limestone, or gravel.
- Applying the Stone – A chip spreader machine evenly distributes the aggregate across the asphalt emulsion while it is still tacky, ensuring optimal adhesion.
- Achieving Uniform Coverage – The stone must cover the surface completely but not excessively, preventing loose gravel buildup while allowing proper bonding.
- Adjusting Application Based on Conditions – Weather and driveway conditions impact how much stone is needed. Professionals adjust the spreading rate for maximum durability.
Once the crushed stone is applied, the next step—rolling and compaction—ensures the material is firmly embedded into the asphalt for a stable, long-lasting finish.
For a professionally installed chip seal driveway that offers long-lasting durability and optimal performance, trust the experts at NEAS. Contact us today to learn more and get a free consultation!
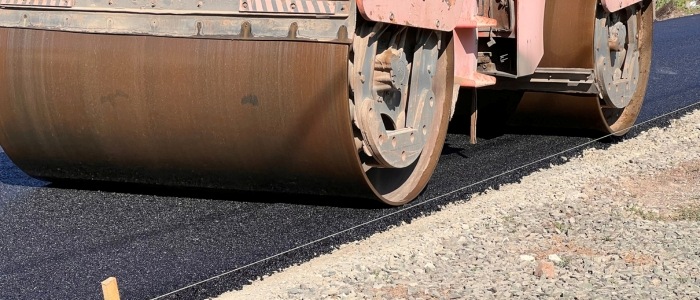
4. Rolling and Compaction
After the crushed stone is spread, the next crucial step is rolling and compaction, which ensures the stone embeds firmly into the asphalt emulsion. This process strengthens the surface, reducing loose gravel and enhancing the driveway’s durability and longevity.
Key Steps in Rolling and Compaction
Proper compaction is essential for creating a smooth, stable, and long-lasting chip seal driveway.
- Using a Heavy Roller – A rubber-tired or steel drum roller is used to press the crushed stone into the asphalt binder, ensuring maximum adhesion.
- Applying Consistent Pressure – Multiple passes with the roller help compact the stone evenly, preventing weak spots or loose aggregate.
- Timing the Compaction – Rolling begins immediately after spreading the stone while the asphalt emulsion is still tacky to achieve optimal bonding.
- Checking for Proper Embedding – The crushed stone should be firmly set into the asphalt, leaving only the top layer exposed for traction and aesthetics.
Once compaction is complete, the driveway enters the curing and setting phase, allowing the materials to fully bond and solidify.
5. Curing and Setting
Once the rolling and compaction process is complete, the driveway enters the chip seal driveway resurfacing curing and setting phase. This stage is crucial for ensuring the asphalt emulsion fully bonds with the crushed stone, creating a strong, durable surface that can withstand daily use.
Key Steps in the Curing and Setting Process
Proper curing time allows the materials to stabilize, preventing premature wear and loose aggregate.
- Allowing the Emulsion to Dry – The asphalt emulsion needs time to harden and bond with the stone. Drying time depends on temperature, humidity, and sun exposure.
- Minimizing Traffic During Curing – For at least 24 to 48 hours, heavy vehicles should be avoided to prevent displacement of the stone.
- Sweeping Loose Aggregate – Some excess gravel may remain on the surface. Light sweeping after the first few days helps remove loose stones and refine the finish.
- Monitoring for Settling Issues – Small shifts in the surface can occur as the material fully cures. Addressing minor adjustments early prevents long-term issues.
Once fully set, the driveway is ready for regular use, though additional layers may be added for extra durability in high-traffic areas. The next step—an optional second chip seal layer—can enhance strength and longevity.
6. Optional Second Layer (Double Chip Seal)
For homeowners looking to enhance durability and longevity, applying a second chip seal layer—known as double chip seal—is an excellent option. This additional layer provides a stronger surface, improved weather resistance, and better traction for high-traffic areas.
Key Benefits of a Double Chip Seal Layer:
Adding a second layer reinforces the driveway’s strength and extends its lifespan.
- Increased Durability – The extra layer offers greater protection against wear and tear, making it ideal for high-traffic driveways.
- Enhanced Weather Resistance – A double chip seal driveway is more resistant to rain, snow, and temperature fluctuations, reducing the risk of cracking.
- Better Traction and Safety – The added stone creates a textured surface, improving grip for vehicles and pedestrians.
- Extended Lifespan – With proper maintenance, a double chip seal driveway can last longer than a single-layer application.
How the Second Layer is Applied:
- A fresh coat of hot asphalt emulsion is applied over the first layer.
- A new layer of crushed stone is evenly spread.
- The surface is rolled and compacted again to ensure a strong bond.
While not always necessary, a double chip seal is a great investment for those who want extra strength and longevity from their driveway. Once this step is complete, the final phase—maintenance and upkeep—helps ensure lasting performance.

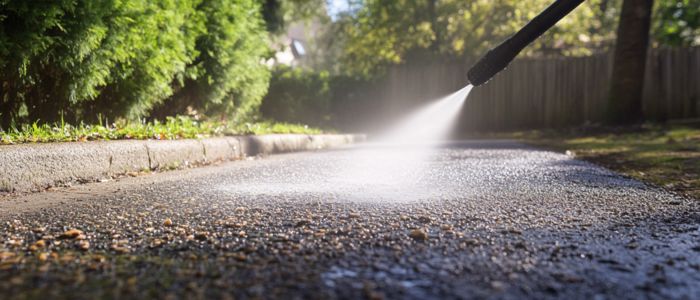
7. Final Maintenance
Once the chip seal driveway resurfacing is fully set, ongoing maintenance is key to preserving its durability and appearance. While chip seal driveways require less upkeep than asphalt, regular care helps prevent premature wear and extends their lifespan.
Essential Maintenance Tips:
By following these simple maintenance steps, you can keep your driveway in top condition for years.
- Sweeping Loose Stones – Within the first few weeks, sweep away any loose gravel to prevent excess buildup and ensure a smooth surface.
- Routine Cleaning – Remove dirt, debris, and leaves to prevent buildup that could weaken the surface over time.
- Addressing Minor Repairs – If small cracks or potholes appear, patch them early to prevent further damage.
- Resealing When Necessary – Over time, applying a fresh chip seal coat every 5 to 7 years can help maintain strength and appearance.
- Preventing Heavy Damage – Avoid sharp turns, aggressive braking, or heavy loads that could dislodge the stone or damage the surface.
With proper care and occasional touch-ups, a chip seal driveway remains cost-effective, durable, and attractive for many years. If you’re considering resurfacing your driveway with chip seal, contact NEAS today to get started!

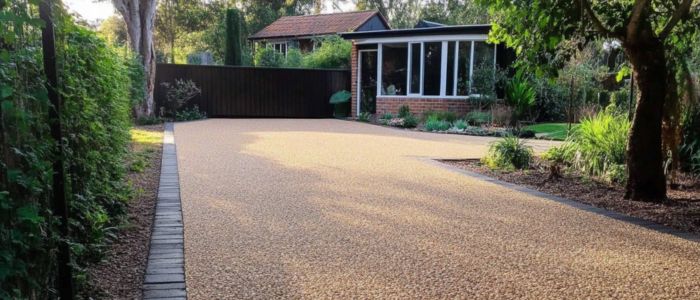
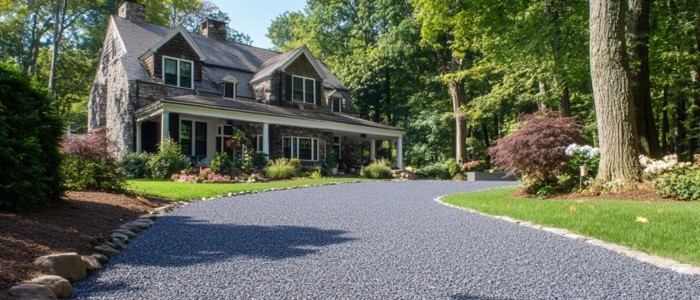
Benefits of Chip Seal Driveways
Choosing chip seal driveway resurfacing offers several advantages over traditional paving methods. From cost savings to enhanced durability, this resurfacing solution is a smart investment for homeowners seeking a reliable and visually appealing driveway.
Cost-Effectiveness
Chip seal driveways are more affordable than traditional asphalt or concrete surfaces. The materials and installation process require less labor and resources, making it a budget-friendly option that delivers long-lasting results.
Aesthetic Appeal
With a variety of stone colors and textures available, chip seal driveways can be customized to complement your home’s design. The natural look provides a rustic charm that enhances curb appeal while blending seamlessly with the surroundings.
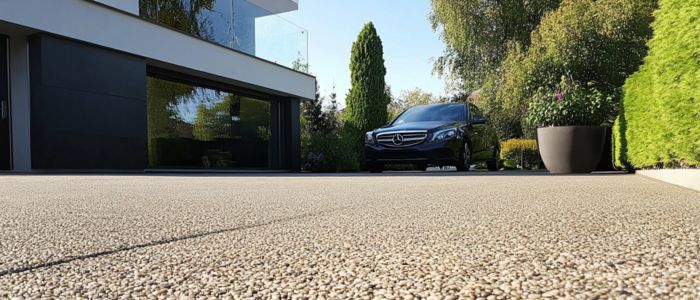
Durability and Low Maintenance
Chip seal driveways can withstand years of use with minimal upkeep. The flexible asphalt base resists cracking, and the stone surface helps protect against wear and tear. Occasional sweeping and minor patching keep it in great shape for the long run.
Quick Installation
Compared to asphalt or concrete, chip seal driveway resurfacing requires less time to install. The entire process, including curing, is typically completed within a few days, allowing for faster use and minimal disruption to your property.
Better Traction & Safety
The textured stone surface provides better grip than smooth asphalt, making chip seal driveways safer in wet or icy conditions. This added traction reduces the risk of slipping for both vehicles and pedestrians.
A chip seal driveway is a practical, attractive, and durable choice for any homeowner looking to upgrade their driveway. Contact NEAS today to learn more about how this cost-effective solution can enhance your property!
Thinking About a New Chip Seal Driveway?
Request a Free Quote
Our team is ready to help you create a durable, beautiful surface that stands the test of time. Contact us today to learn more.
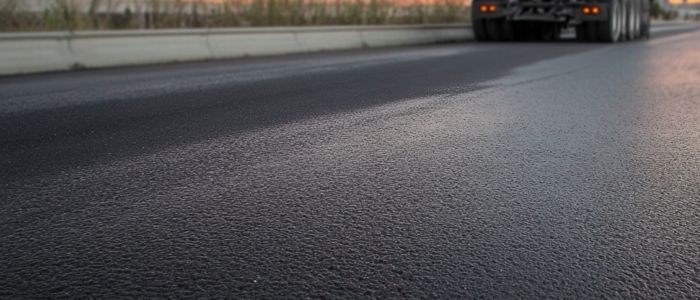
Chip Seal vs. Asphalt Driveways: A Comparison
When choosing between chip seal driveway resurfacing and asphalt driveways, it’s essential to compare key factors like cost, installation process, and long-term performance. While both options provide a durable surface, they differ in appearance, maintenance, and overall cost-effectiveness.
Comparison Table: Chip Seal vs. Asphalt Driveways
| Feature | Chip Seal Driveway | Asphalt Driveway |
|---|---|---|
| Cost | More affordable, lower material & labor costs | Higher cost due to materials & installation time |
| Installation Process | Quicker, completed in a few days | Requires multiple layers, longer curing time |
| Aesthetic Appeal | Natural, rustic look with custom stone options | Smooth, black surface with limited customization |
| Durability | Withstands weather but may need occasional touch-ups | More resistant to heavy traffic but prone to cracking |
| Maintenance | Low maintenance, periodic recoating every 5-7 years | Requires sealcoating every few years to prevent deterioration |
| Traction & Safety | Better grip due to textured stone surface | Can become slippery when wet, especially without proper maintenance |
| Best For | Rural roads, driveways, areas with light-to-moderate traffic | High-traffic areas, commercial lots, urban driveways |
Key Takeaways
Choosing between chip seal and asphalt depends on your budget, aesthetic preferences, and long-term maintenance expectations. While both options provide durability, they cater to different needs based on traffic levels, cost, and upkeep requirements.
- Cost-conscious homeowners may prefer chip seal for its affordability and quick installation.
- Asphalt driveways are better suited for heavier traffic and long-term durability but come with a higher price and maintenance demands.
- Both options offer unique advantages, making the best choice dependent on budget, aesthetic preferences, and maintenance expectations.
Considering chip seal for your driveway? Contact NEAS today to learn more about how it can be a cost-effective and durable solution for your home!
Chip Seal Driveway Resurfacing FAQs
If you’re considering chip seal driveway resurfacing, you may have some questions about its durability, maintenance, and cost-effectiveness. Below, we answer some of the most common questions to help you make an informed decision.
A well-installed chip seal driveway can last 7 to 10 years with proper maintenance. Periodic sweeping and occasional resurfacing every 5 to 7 years help extend its lifespan.
Yes! Chip seal is a durable, low-maintenance, and cost-effective option for driveways. It provides a textured surface for better traction and is less prone to cracking than asphalt.
Chip seal offers better stability and durability than gravel while maintaining a natural, rustic appearance. Unlike loose gravel, chip seal binds the stone with asphalt, reducing dust, washouts, and displacement.
– Sweep loose stones periodically to prevent buildup.
– Fill minor cracks before they worsen.
– Avoid heavy loads or sharp turns to prevent damage.
– Reapply a fresh chip seal layer every few years for extended durability.
Yes! Chip seal is typically 30-50% less expensive than asphalt, making it a budget-friendly alternative with a similar lifespan when properly maintained.
If you’re considering chip seal resurfacing for your driveway, contact NEAS today for expert advice and a free consultation!
If you’re considering chip seal resurfacing for your driveway, contact NEAS today for expert advice and a free consultation!
Thinking About a New Chip Seal Driveway?
Request a Free Quote
Our team is ready to help you create a durable, beautiful surface that stands the test of time. Contact us today to learn more.
Conclusion
Chip seal driveway resurfacing is a durable, cost-effective, and low-maintenance solution. It offers quick installation, excellent traction, and a natural aesthetic, making it a great alternative to asphalt. While occasional maintenance is needed, its affordability and longevity make it a smart investment.
Interested in resurfacing your driveway? Contact NEAS today for expert guidance and a free consultation!